Mock Tudor cladding
Traditionally Tudor homes were built using a timber frame, usually oak timber posts and beams which were then infilled with ‘wattle and daub’ constructed by the use of thin oak uprights or ‘staves’, which are interwoven with hazel strips to form a rigid panel. This was then plastered with a mixture of clay, dung and chopped straw and left to dry. To protect it from the weather, it was whitewashed. It’s no surprise to hear that this form of construction no longer meets our Warranty requirements.
In modern construction some architects wish to replicate this effect by planting timbers on masonry cavity walls and rendering between them. Over the years we have had a number of claims where this has been incorrectly constructed and failed prematurely. More recently we have had an increased number of enquires of mock Tudor cladding on external walls.
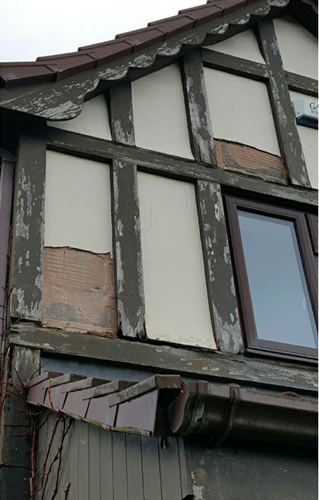
This image below demonstrates what can go wrong, in this instance the timber has been planted onto the external masonry cavity wall and the panels rendered in between. Movement in the timber then leads to water ingress behind the render and premature failure of the render system.

To minimise the chance of premature render failure the wall should be rendered in its entirety and the timber planted onto the render. This way the render is continuous throughout and any shrinkage of the timber does not affect the water tightness of the render.
Other key points for mock Tudor cladding are as follows:
- To minimise movement, all timber used for mock Tudor cladding, regardless of species, should be kiln dried
- It’s recommended that the timber is not sealed against the render as the likelihood is that this can lead to moisture being trapped behind the structure, e.g. where horizontal timbers are against the wall the top more exposed mastic seal may fail first allowing moisture in, whilst the bottom mastic seal remains intact trapping the moisture behind
- In general, it is better to fix the timber ‘Pith out’ which means any warping across the width of the timber so the edges will warp towards the wall. Using only quarter sawn timber will also help reduce this, however it’s incredibly expensive
- Depending on the desired visual effect, timber thickness can range from 19-40mm max. 40mm is generally the maximum, as thicker timbers can exert higher forces when warping which can pull the fixings out
- Due to the limited access, the back of the timber should be decorated/stained before it is fixed to the wall
- In terms of life span, the functional requirements of the LABC Warranty Technical Manual discusses decorative claddings which, with the render behind, would be applicable in this scenario: ‘Decorative Claddings’: Whilst there is and can be no policy responsibility and/or liability for a performance life of 60 years or less for a ‘cladding’ which has a ‘decorative function only’ (i.e. with the main substrate wall construction providing the main weather-proof barrier), a ‘decorative’ type cladding shall be designed and constructed so they have an intended life of not less than 15 years. Therefore, a minimum class of moderately durable timber should be used to achieve a 15-year durability. A slightly durable timber (coated) may achieve 15 years if treated with an ongoing maintenance plan in place. However, as the rear face of the timber cannot be treated, a minimum class of moderately durable timber should be used, e.g. cedar, Douglas fir, oak, etc.
- When jointing mock Tudor cladding a butt joint is sufficient. Halved joints should be avoided, due to the potential to trap moisture and biscuit joints also avoided, as often the biscuit is also not durable enough
Specific to oak:
- Where oak is specified, the fixings should not react with the timber or timber treatment, therefore stainless steel fixings are recommended
- With oak, there is a risk of extractive staining, where moisture will remove tannings from the oak and stain the render (particularly where light renders are used)
- As above, the oak used in mock Tudor cladding should be kiln dried
Summary
We have seen a number of enquiries regarding the use of mock Tudor cladding. As this is not an area which we currently have guidance within the Technical Manual we have outlined some key areas to look for where mock Tudor cladding is specified.

